Introduction
The Chenga – Sherekhan Tome of Wisdom is an item that goes into your Adventurer’s Tome equipment slot. The Chenga Tome is an upgraded version of the Adventurer’s Tome, which gives 30% additional Combat EXP from quests as well as an increased Vision Range of +150m. The increased EXP from quests makes the Chenga Tome a must-have if you want to level by questing (which is currently the fastest way to level from 59 – 61).
To obtain the Chenga Tome, you must complete a questline called [Lv.53] The Adventurer’s Tome Regarding the Legend of Chenga. The questline has 22 quests in total and can be found in the suggested tab of your quest log. The questline requires at least one character in your family to be over level 53 and you will also need 170 energy in total to complete. Other than that the questline is easy to complete and doesn’t require you to kill any monsters. It is mostly just running from one place to another.
The Chenga Tome is family bound, meaning you can swap it between characters by putting it in your storage for another character to collect. However, if you lose your Chenga Tome, you will need to complete the quest again on a different character.

Questline Walkthrough
Hoom’s Song
The first quest is called Hoom’s Song. Click the navigation button in your quest window and you will receive a waypoint to Macalod Hill (north of Khimut Lumber Camp) in Dreighan. There is an NPC there called Aljai who will give you the first quest. To complete the quest you must go to the altar located at Dormann Lumber Camp.
The Rumbling Sound of Dreighan
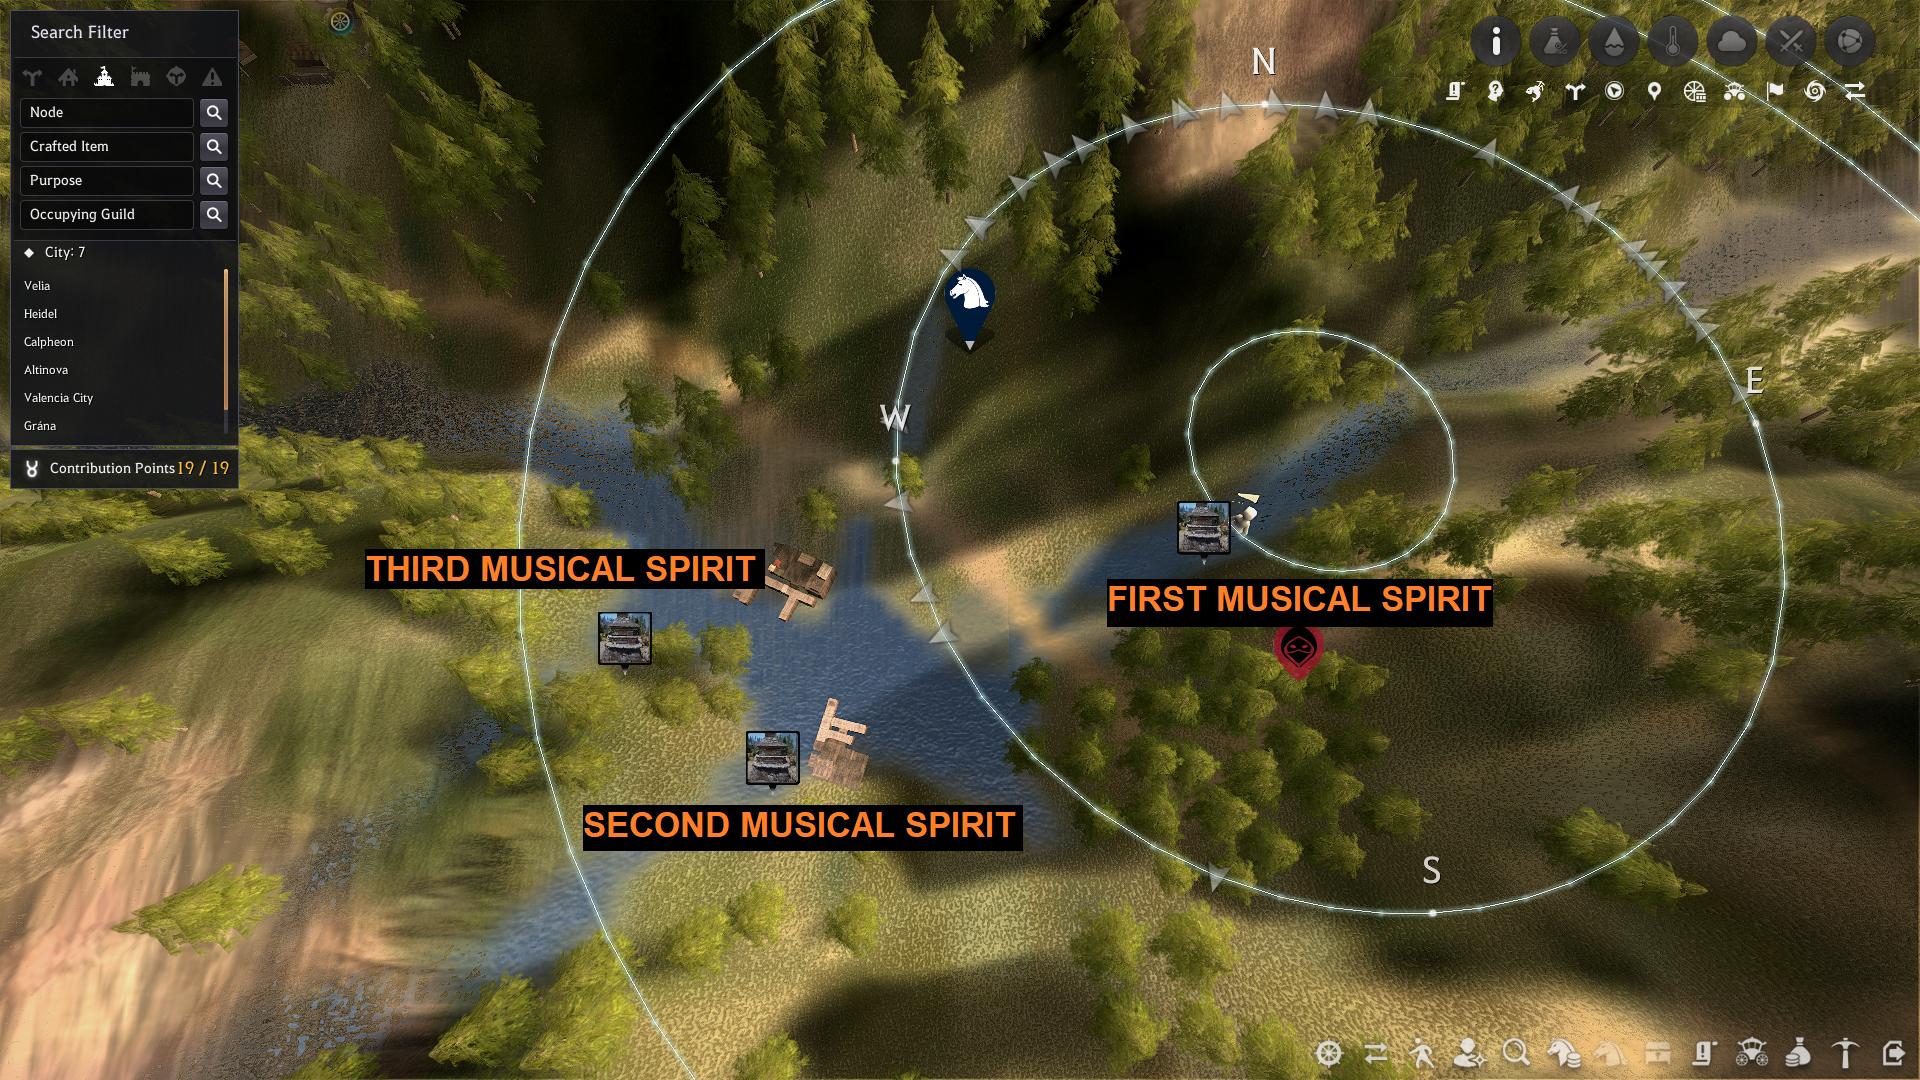
The altar will give you a follow-on quest and you must speak to the three Musical Spirits nearby. The locations are shown in the images below, use the minimap as a reference to help you find them (you can enlarge all the images in this guide by clicking them). You must go to the Musical Spirits in the correct order so head to the one on the east side first.
Each Musical Spirit will give you a riddle that you must answer correctly. Each answer will cost 20 energy so make sure to select the correct answer.
The answers are:
- First Musical Spirt: Melody of the Sun
- Second Musical Spirit: Melody of the Flowers
- Third Musical Spirit: Sing the song of the Wind
Complete the quest at the Third Musical Spirit and pick up the next quest.
Roads that Merge into One
After accepting the quest there will be a trail of Musical Spirits behind you. Follow them and they will lead you around the river to the east side. Climb up the rocks and follow them into a cave. The cave can be quite dark, especially at night time so use the Atanis Firefly in your inventory (given to you from the last quest). Climb all the way to the top and you will find the next Musical Spirit to hand in the quest and pick up the next part.
Hammer of Balance
Akum’s Little Finger Pagoda will give you a quest to solve the 3 riddles. You must go to each of the altars around Garmoth’s Nest and give them the answers. Each answer requires 20 energy and you must do them in the correct order.
Correct answers and order:
- Mountain Aura: Hit with Hammer (3rd option)
- Boulder Aura: Meditating (1st option)
- Iron Wall Aura: Place your hands on the ground. (3rd option)
- Akum’s Ring Finger Pagoda: Hit with Hammer (1st/only option)
After solving all of the riddles and going back to the fourth altar to answer the final question, you will complete the quest. You will then get another quest from this altar.
The Silent Hanging Gardens
Follow the autopath up the mountain to the east of Duvencrune. Here you will find the Gervish Pagoda in the middle of Kiernak Falls. Whilst standing on the rock, face northwest and swim in this direction. The Traces of Ancient Gervish is in the water and you must dive down to interact with it. Use the chat option to complete the quest. This uses 10 energy. Then go back to the Gervish Pagoda on the rock in the middle of the water to hand in the quest.
Kiernak’s Acknowledgement
Go back to the Gervish Altar. There is a way to safely drop down if you carefully slide down the rocks one at a time. It’s recommended to just take the safe pathway even though it is a bit slower. Interact with the Gervish Altar to complete the quest and obtain the Gervish Slate
Clotting Time
There will be an object behind you on the floor at the other side of the cave. Interact with the object to pick it up then go back to the coffin. On the right side of the coffin, there is a Dry Branch you can interact with to start a fire. Interact with the coffin to hand in the quest and receive the final slate piece.
Combine Ancient Figures
Open your inventory and click the “Yaz’s Combinables Pouch” icon at the bottom. Then, right-click the items to add them to Yaz’s Pouch.

Move the slate pieces in a horizontal line like in the image below.
They should be in the following order (left to right):
- Hoom
- Akum
- Gervish
- Macalod
- Doroter
A plus (+) sign will appear in the corner of the first piece. Click this to combine the slates and then go to the pillar and interact with it to complete the quest.

A Recorded Myth
Finally, you must go back to Macalod Hill and talk to Aljai (the first NPC you spoke to at the beginning of the quest line). Complete the quest by talking to him. He will give you a Chenga Crystal of Wisdom.
Open the processing window (L) then select Simple Alchemy along the top and combine the Chenga Crystal of Wisdom with your Adventurer’s Tome to create the Chenga Tome. You can now right-click this to equip it.
If you don’t have the Adventurer’s Tome yet you can get it by speaking to your black spirit. The quest is called Black Spirit’s Gift (Adventurer’s Tome) or will be called Lost Gift (Adventurer’s Tome) if you have done it before. Both quests can be found under main quests. You simply need to speak to your black spirit to complete it (click the go back option to hand it in or resummon the black spirit).


Amazing and Detailed Thx a lot for the effort pretty much appreciated
Hello at Hammer of Balance questline second and third answers should be changed i lost 40 energy 🙁