
Introduction
Fishing is one of the easiest life skills to get into and one of the best ways to make a profit while AFK. It can seem like a lot of setup and a lot to learn at first, but really, it is quite simple, and once you have the gear and location to fish, you can make lots of silver with minimal effort.
This guide is one of the largest and most complex, as we have tried to cover everything about fishing. If you are unsure of anything or want more clarification, please leave a comment or contact us through Discord.
I would also advise checking out these other resources:
Fishing Gear and Buffs
Fishing Rods and Floats
Fishing Rods can be equipped in your fishing slot on the life skill equipment window. There are many different types of fishing rods that have different effects and uses. Some can be enhanced using Black Stones to increase the stat effects on the rod, or increase the fishing rod durability. There are also some fishing rods that cannot be repaired.
Recommended Fishing Rods
For AFK Fishing:
- Use an enhanced +10 Balenos Fishing Rod
- This fishing rod has higher durability and will last longer if you are AFK.
- The rod also has an effect that increases your Auto-Fishing Reduction.
- The fishing rod can be repaired, and you can brand it with an
 Item Brand Spell Stone to reduce the durability consumption.
For Active Fishing:
- You can use a Triple-Float Fishing Rod
- This rod has a chance to catch 1-4 fish with each cast.
- It has limited durability and cannot be repaired, so it is better to use it while active fishing.
- You can also use it when AFK fishing if you can get high Durability Reduction Resistance (DRR). Without high DRR and lots of inventory space, the fishing rod will either break or you will fill your inventory too quickly, which is just a waste of the Triple-Float.
Below is a full breakdown of all fishing rods:
- Big fish = Blue-grade Fish
- Rare fish = Yellow-grade Fish
| Item Name | Details | How to obtain | |
|---|---|---|---|
| Old Fishing Rod | Durability: 10 Cannot be repaired Cannot be enhanced |
Tool Workshop (Level 1) Log x1 |
|
| Fishing Rod | Durability: 30 Cannot be repaired Cannot be enhanced |
Sold by fishing vendors for 500 silver |
|
| Thick Fishing Rod (Requires Fishing Beginner 10) |
Durability: 40 Fishing Speed Level +1 Cannot be repaired Cannot be enhanced |
Tool Workshop (Level 1) Ash Timber x1 Copper Ingot x1 Black Stone Powder x3 |
|
| Steel Fishing Rod (Requires Fishing Skilled 5) |
Durability: 65 Fishing Speed Level +2 Cannot be repaired Cannot be enhanced |
Tool Workshop (Level 2) Ash Timber x1 Steel x2 Black Stone Powder x4 |
|
| Balenos Fishing Rod | Durability: 50 to 100 (depending on enhancement) Auto-fishing Time -10% to -25% (depending on enhancement) Can be repaired Can be enhanced up to +10 |
Tool Workshop (Level 3) Ash Timber x1 Steel x2 Pure Copper Crystal x5 Monk’s Branch x9 Black Stone Powder x15 |
|
| Epheria Fishing Rod | Durability: 50 to 150 (depending on enhancement) Can be repaired Can be enhanced up to +10 |
Tool Workshop (Level 3) Birch Timber x1 Steel x2 Pure Iron Crystal x5 Monk’s Branch x9 Black Stone Powder x15 |
|
| Mediah Fishing Rod (Requires Fishing Artisan 1) |
Durability: 50 Chance to Catch Rare Fish +1% to +5% (depending on enhancement) Can be repaired Can be enhanced up to +10 |
Tool Workshop (Level 3) White Cedar Timber x1 Steel x2 Pure Zinc Crystal x5 Monk’s Branch x9 Black Stone Powder x15 |
|
| Calpheon Fishing Rod (Requires Fishing Professional 1) |
Durability: 50 Chance to Catch Big Fish +1% to +11% (depending on enhancement) Can be repaired Can be enhanced up to +10 |
Tool Workshop (Level 3) Fir Timber x1 Steel x2 Pure Lead Crystal x5 Monk’s Branch x9 Black Stone Powder x15 |
|
| Golden Fishing Rod (Requires Fishing Professional 5) |
Durability: 100 Fishing Speed Level +3 Cannot be repaired Cannot be enhanced |
Tool Workshop (Level 3) Ash Timber x1 Steel x2 Gold Ingot x2 Black Stone Powder x5 |
|
| Triple-Float Fishing Rod (Requires Fishing Skilled 5) |
Durability: 30 Can catch 1-4 fish at once Cannot be repaired Cannot be enhanced |
Can only be obtained through quests or the Central Market Fish for Villagers [Weekly] A Special Fishing Rod Rewards x3 Fishing Rods |
|
| Grandpa Cron’s Fishing Rod | Durability: 2000 Can catch 1-4 fish at once Cannot be repaired Cannot be enhanced |
Limited Sales from the Pearl Store | |
| Cool Wind Fishing Rod | Durability: 1000 Can catch 1-4 fish at once Cannot be repaired Cannot be enhanced |
Obtained from Challenges (Y) when reaching level 60 on a Season Character (Once per account – event) |
Fishing Floats are equipped in your Float slot in the Lifeskill gear window. Floats can be repaired and enhanced using Black Stones.
Below is a full breakdown of all fishing floats:
- Big Fish = Blue-grade Fish
- Rare Fish = Yellow-grade Fish
| Item Name | Details | How to obtain | |
|---|---|---|---|
| Maple Float (Requires Fishing Artisan 1) |
Durability: 50 Chance to Catch Rare Fish +1% to +5% (depending on enhancement) Can be repaired Can be enhanced |
Tool Workshop (Level 2) Maple Timber x1 Oil of Tranquility x3 Red Crystal x2 Pure Lead Crystal x2 |
|
| Ash Tree Float (Requires Fishing Professional 1) |
Durability: 50 Chance to Catch Big Fish +1% to +11% (depending on enhancement) Can be repaired Can be enhanced |
Tool Workshop (Level 2) Ash Timber x1 Oil of Tranquility x3 Translucent Crystal x2 Pure Lead Crystal x2 |
Fishing Mastery Gear
Fishing Mastery is important for fishing, as the chance of catching a Prize Fish (your main income source) depends entirely on your fishing mastery.
- For example, with no Fishing Mastery, your chance of catching a Prize Fish is 0% chance
- 1500 Fishing Mastery gives you are 3.75% chance to catch a fish/item from the Prize Fish loot table
- 3000 Fishing Mastery gives you a 6.25% chance to catch a fish/item from the Prize Fish loot table
Items that give Fishing Mastery:
| Icon | Item Name | Buff | How to obtain |
|---|---|---|---|
| Deep Blue Tidal Draught | Fishing EXP +30% Fishing +3 Fishing Mastery +100Duration: 600 min |
Processing (L) – Simple Alchemy Essence of Tides x1 |
|
| Sethra’s Artifact – Fishing Mastery | Fishing Mastery +10 | Rare drop from Imperial Fish Delivery | |
| Sethra’s Artifact – Life Skill Mastery | Life Skill Mastery +7 | Rare drop from all Life Skills | |
 |
Vital Crystal | Life Skill Mastery +10 |
Obtained from [Repeat] Vital Crystal quest at Hyunyong (Nampo Moodle Village) Requires you to hand over Forest Crystal x1, Trace of Forest x50 |
| Loggia Fishing Chair (up to +20) |
Fishing Mastery +3 to +280 (depending on enhancement) Fishing EXP +10% Auto-fishing Time -5% |
Sold by Camellia Loggia and Zaaira for 1 million silver | |
| Crio Fisher’s Chair (up to +20) |
Fishing Mastery +4 to +330 (depending on enhancement) Fishing EXP +20% Auto-fishing Time -7% |
Sold by Geranoa and Zaaira for 10 million silver | |
| Manos Fishing Chair (up to +20) |
Fishing Mastery +5 to +400 (depending on enhancement) Fishing EXP +30% Auto-fishing Time -10% |
Processing (L) > Manufacture Manos Stone x5 Magical Shard x50 Sturdy Timber Square x10 Tear of the Great Ocean x10 |
|
| Loggia Fisher’s Clothes (up to +20 enhancement) |
Fishing Mastery +3 to +280 Fishing +1 to +2 Movement Speed +1 to +2 (depending on enhancement) |
Sold by Camellia Loggia and Zaaira for 1 million silver | |
| Crio Fisher’s Clothes (up to +20 enhancement) |
Fishing Mastery +4 to +330 Fishing +1 to +2 Movement Speed +1 to +2 (depending on enhancement) |
Sold by Geranoa and Zaaira for 10 million silver |
|
| Manos Fisher’s Clothes (up to +20 enhancement) |
Fishing Mastery +5 to +400 Fishing +1 to +3 Movement Speed +1 to +3 (depending on enhancement) |
Processing window (L) > Manufacture Ocean Sapphire x30, Manos Stone x5, Magical Shard x50, Tear of the Great Ocean x30 |
|
| Loggia Accessories (up to +20 enhancement) |
All Life Skill Mastery +5 to +60 (depending on enhancement) |
Sold by Camellia Loggia and Zaaira for 1 million silver | |
| Geranoa Accessories (up to +20 enhancement) |
All Life Skill Mastery +8 to +110 (depending on enhancement) |
Sold by Geranoa and Zaaira for 10 million silver | |
| Manos Accessories (up to +5 enhancement) |
All Life Skill Mastery +15 to +150 (depending on enhancement) |
Life Skill Mastery Guide | |
| Preonne Accessories (up to +10 enhancement) |
All Life Skill Mastery +75 to +250 (depending on enhancement) |
Preonne Accessories Guide | |
| Lightstone Combo [Fisher’s Secrets] |
Fishing Mastery +45 | Lightstone of Flora: Patience Lightstone of Flora: Patience Lightstone of Flora: Patience Iridescent Lightstone Artifacts and Lightstones Guide |
|
| Khan’s Heart: Life | All Life Skill Mastery +25 | Khan’s Heart Guide | |
| Lil’ Otter Fishing Carrier (Pearl item) |
Fishing Mastery +100 Fishing EXP +20% Durability Reduction Resistance +10% |
Obtained from the Pearl Store during special limited sales |
Durability Reduction Resistance
Each time you cast your fishing rod, your fishing equipment (eg. Fishing Chair, Fishing Rod, Float) has a chance of losing 1 durability. If the durability reaches zero or you run out of inventory space, you will stop fishing.
There are 3 main ways of reducing the chance of losing durability, which is often referred to as Durability Reduction Resistance (DRR).
- Item Brand Spell Stones can be used on a Fishing Rod/Chair/Float to reduce the chance by 50% (purchased from the Pearl Store > Function > Misc. > 400 Pearls)
- Your fishing lifeskill level reduces the chance by 0.5% for each level (with a cap of 60% at Guru Lv. 20)
- Various items and buffs can be used to reduce the chance further
These 3 factors are then multiplied together to create your final (%) chance of losing durability per cast.
Below are items and buffs that offer DRR:
| Icon | Sources of DRR | Details | Reduction (%) |
|---|---|---|---|
| Pets (Eg. Young Azure Dragon) |
Obtained through the Pearl Store or Central Market Ideally, you would have x4 Tier 4 pets and x1 Tier 5 pet with DRR (Click image to see all pets with DRR) |
21% (1% per tier) |
|
| Pearl Outfit + Underwear | Purchase from the Pearl Store or Central Market Requires underwear for the 8-part set for DRR. |
10% | |
| Mainhand Weapon Outfit | Purchase from the Pearl Store or Central Market Goes into the Mainhand weapon slot and has an item effect |
10% | |
| Awakening Weapon Outfit | Purchase from the Pearl Store or Central Market Goes into the Awakening weapon slot and has an item effect
|
10% | |
| Lightstone Combo [Blacksmith’s Blessing] |
Lightstone of Fire: Predation Lightstone of Earth: Fitted Lightstone of Wind: Feather Lightstone of Wind: Fortune Artifacts and Lightstones Guide |
30% | |
| Lil’ Otter Fishing Carrier | Obtained from the Pearl Store during special limited sales | 10% |
Auto-fishing Reduction
Auto-fishing reduction is important if you are planning to AFK fish. When you get a “bite”, the counter will start, and you will automatically catch a fish after 3 minutes if your character is left inactive. By reducing the auto-fishing time, the default 3-minute timer can be reduced by up to a cap of 67% through various buffs. This means that with the maximum 67% reduction, you will be catching a fish after 1 minute instead of 3 minutes.
| Icon | Item Name | Details | Reduction (%) |
|---|---|---|---|
| Pet (eg. Young Azure Dragon) |
Obtained from the Pearl Store during special limited sales | Tier 1/2 = 20% Tier 3 = 25% Tier 4/5 = 30% |
|
| +10 Balenos Fishing Rod | Tool Workshop (Level 3) Ash Timber x1 Steel x2 Pure Copper Crystal x5 Monk’s Branch x9 Black Stone Powder x15 |
25% | |
| Lightstone Combo [Nibbles] |
Lightstone of Flora: Bite Lightstone of Flora: Patience Lightstone of Wind: Lungs Iridescent Lightstone Artifacts and Lighstones Guide |
15% | |
| Coconut Cocktail | Craft via a Cooking Utensil in your residence if at least Cooking Professional 1 Cooking Ingredients: Coconut x2 + Makgeolli x1 + Essence of Liquor x2 + Fruit x1 + Mineral Water x5 |
5% | |
| Balacs Lunchbox | Craft via a Cooking Utensil in your residence if at least Cooking Artisan 1. Cooking ingredients: Eilton Sandwich x2 + Citron Juice x2 + Citron Candy x2 |
7% | |
| Marvelous Balacs Lunchbox | Processing (L) – Simple Cooking: Balacs Lunchbox x3 Ouk Pill of Time and Tide x1 |
10% | |
| Crio’s Fishing Chair |
Crafted at the Carpentry Workshop level 3 of each city
You can also exchange Discarded Glass Bottle x5 for Crio’s Fishing Chair at Crio in Velia |
5% | |
| Crio’s Sturdy Fishing Chair | Complete [Leap] Honor to the Fishing Family #1 (cannot be repaired) |
5% | |
| Loggia Fishing Chair | Sold by Camellia Loggia and Zaaira for 1 million silver | 5% | |
| Crio’s Fishers Chair | Sold by Geranoa and Zaaira for 10 million silver | 7% | |
| Manos Fishing Chair | Processing (L) > Manufacture Manos Stone x5 Magical Shard x50 Sturdy Timber Square x10 Tear of the Great Ocean x10 |
10% | |
| Event Items | Various event items, eg. [Event] Snowfall Noodle Craze = 5% reduction [Event] Wise Housekeeper = 10% reduction |
– |
Fishing Level Buffs
Along with DRR and Auto-Fishing Reduction, another important stat is your Fishing Level. This can be found in your “My Information” window (P), and you want to always have Fishing Level 5. This stat reduces your time until a “bite” by up to 50% and makes a huge difference.

Level 5 Fishing is easy to obtain and can be obtained through the following items/buffs:
| Icon | Item/Buff Name | Details | Fishing level increase |
|---|---|---|---|
| Pets | Obtained from the Pearl Store or Central Market Each pet can have a Fishing +1 Level increase pet skill Skills obtained are completely random for all pets, there is no specific pet needed |
+1 per pet | |
| Art of Fishing (Guild Skill) | Guild Skill Fishing Level +1 (per level) – 3 possible levels to obtain |
+3 | |
| Balacs Lunchbox |
Craft via a Cooking Utensil in your residence if at least Cooking Artisan 1. Cooking ingredients: Eilton Sandwich x2 + Citron Juice x2 + Citron Candy x2 |
+2 | |
| Marvelous Balacs Lunchbox |
Processing (L) – Simple Cooking with the following ingredients Cooking ingredients: Balacs Lunchbox x3 + Ouk Pill of Time and Tide x1 |
+3 | |
| Seafood Cron Meal |
Processing (L) – Simple Cooking with the following ingredients
|
+2 | |
| Loggia Fisher’s Clothes | Sold by Camellia Loggia and Zaaira for 1 million silver | +1 to +2 | |
| Crio Fisher’s Clothes | Sold by Geranoa and Zaaira for 10 million silver |
+1 to +2 | |
| Manos Fisher’s Clothes | Processing window (L) > Manufacture Ocean Sapphire x30, Manos Stone x5, Magical Shard x50, Tear of the Great Ocean x30 |
+1 to +3 | |
| Professional Fisher’s Uniform (Costume) | Purchase Professional Fisher’s Clothes at the Luxury Vendor. Then convert into a costume using an Equipment Tailoring Coupon (1500 Pearls) |
+1 | |
| Verdure Draught | Processing (L) – Simple Alchemy: Worker’s Elixir x3 Elixir of Time x3 Elixir of Swiftness x3 Tears of the Falling Moon x1 |
+3 | |
| Life Spirit Stone | Drops from monsters at Navarn Steppe and Polly’s Forest | +2 |
Archaeologist’s Map (Optional)
The Archaeologist’s Map is a treasure item that you can obtain by grinding at Pila Ku Jail and Roud Sulfur Works for the pieces. The map has a special ability that allows you to teleport to town, then back to your original location up to 30 minutes later. If you already have the map, you can use it to save yourself 5 million silver each time you sell your fish.
- Use your Map from your fishing location to teleport to town
- Take the Magnus Teleport from town to your selling location
- Sell your fish, then use the map to instantly teleport back to your fishing location
How to Fish (Basics)
- To start fishing, approach any source of water, then switch to fishing stance through the “Change Stance” UI icon in the top left.

- Once you have selected the fishing stance, press [SPACE] to cast your fishing line in front of you. Your character will then begin fishing, and you must wait until you have a “bite”.
- When you have a “bite”, it will be indicated with a speech bubble above your head containing a fish icon.

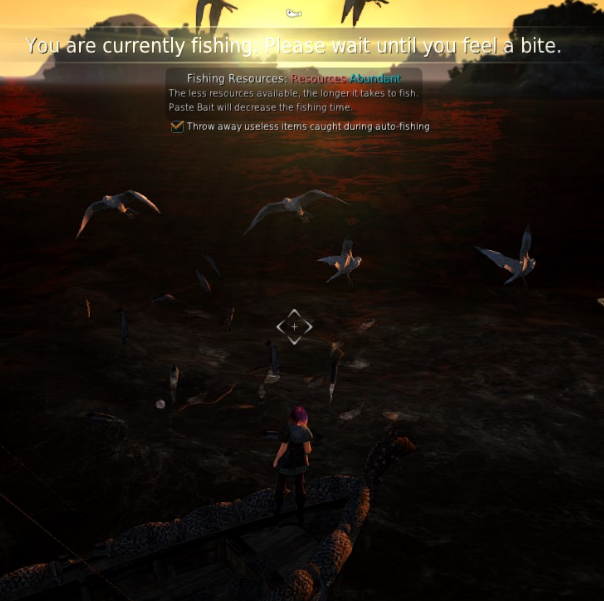
- There are different Fishing Resources depending on where you are fishing and how many people have been fishing in that area. The fewer resources there are, the longer it will take for you to get a “bite”, so ideally you want Abundant resources, but it is not too important that you should worry about it. The best fishing spots are often Exhausted resources since many players fish there, but they are still the best for silver making!
- Below are the fishing resources, listed from highest to lowest:
- Abundant, Average, Not Enough, Exhausted

- When the speech bubble appears to indicate a “bite”, you can press [SPACE] again to start the mini-game. A bar will pop up that will fill and empty up to 3 times before automatically failing. You must press [SPACE] again whilst the bar is in the blue area.
- If you succeed, you will reach the last phase of the mini-game. If you fail, you will have to recast your line again and wait for another bite.
- You can obtain a perfect reel and skip the final part of the mini-game if you press spacebar at the exact time the bar is completely full.

- The last phase of the minigame is when you just have to push the correct keys within the time given. The longer the sequence, the better the fish you are reeling in!

- After you have completed all phases of the mini-game, you will receive a window with the fish/item you have just caught.
- There are 5 grades of fish you can catch, higher grades of fish are worth more silver: White, Green, Blue, Yellow, Red (Prize Fish).
- Other items you can obtain: Plump Coelacanth (if you are fishing in designated event areas), Ancient Relic Crystal Shards, Fishing Byproducts, Bottle with a Note
- Press [R] to pick up the fish and put it in your inventory. If you recast your line without pressing [R] to collect the fish, then the fish will be deleted.

- When you go to cast your line, you can also hold down [SPACE] to invest energy into your cast. With a maximum of 10 energy points, you can roll for a chance to catch multiple fish. If you combined this method with a Triple-Float Fishing Rod, you have a chance to obtain 5 fish in one cast! It is generally not recommended since there are more useful uses for energy.

Setting up AFK Fishing
To set up AFK fishing, all you have to do is cast your line. When you get a bite, your character will wait 3 minutes (base time) for you to manually catch the fish. If you don’t catch the fish, then the game will automatically catch it for you, and it will go straight into your inventory.
Before you go AFK, make sure to check your AFK settings and location. You can tick the box shown in the Fishing UI to make sure you can’t be kidnapped by other players on a boat. You should also make sure to AFK in a safe zone, or you may want to use a character under level 50 if you are going AFK for a long period of time, because some players may decide to try and kill you or take you with them on an adventure.
You can also select the grade of fish you would like to throw away.
- For example, if you select the green fish icon, you will throw away the following fish grades: White and Green.
- If you select the yellow fish icon, you will throw away: White, Green, Blue, and Yellow.
A certain Fishing Life skill level is required to use the discard setting:
- White Fish icon: Professional Lv. 1+
- Green Fish icon: Professional Lv. 1+
- Blue Fish icon: Artisan Lv. 1+
- Yellow Fish icon: Master Lv. 1+

After double-checking your location and discard settings, the last thing to do is close the game to the tray (this does not exit the game fully). This is when the game runs as a background process but does not load your graphics card. It is useful as it uses fewer resources on your computer. You can do this by pressing [ESC] > “Disconnect” > “Minimize to Tray”.
Where to Fish
Most players choose to AFK fish for extra silver while they are busy IRL or playing other games, etc. Not many players choose to actively fish as it can be a little boring or require moving spots often (check out hotspot fishing if you are interested in active fishing). The money you make from fishing mainly comes from prize fish (red grade) catches, and I would recommend aiming for at least 1500 Fishing Mastery if you want good, consistent silver, since your chance to catch prize fish relies completely on mastery.
Most of the time, Velia Beach is recommended as it is a reliable spot where you can expect a decent number of prize fish. There are some “jackpot” locations where you can catch a prize fish worth billions of silver, but these fish are rarer, and the silver you earn tends to be less consistent than Velia. You are more likely to catch 10+ Silver Beltfish at Velia before catching a single Blobfish. So even though the Blobfish is worth a lot more than a Silver Beltfish, they are far less often, and Velia will be more consistent silver overall. There are also the Plump Coelacanth fish that can be caught in Velia, which can be exchanged for items or extra silver.

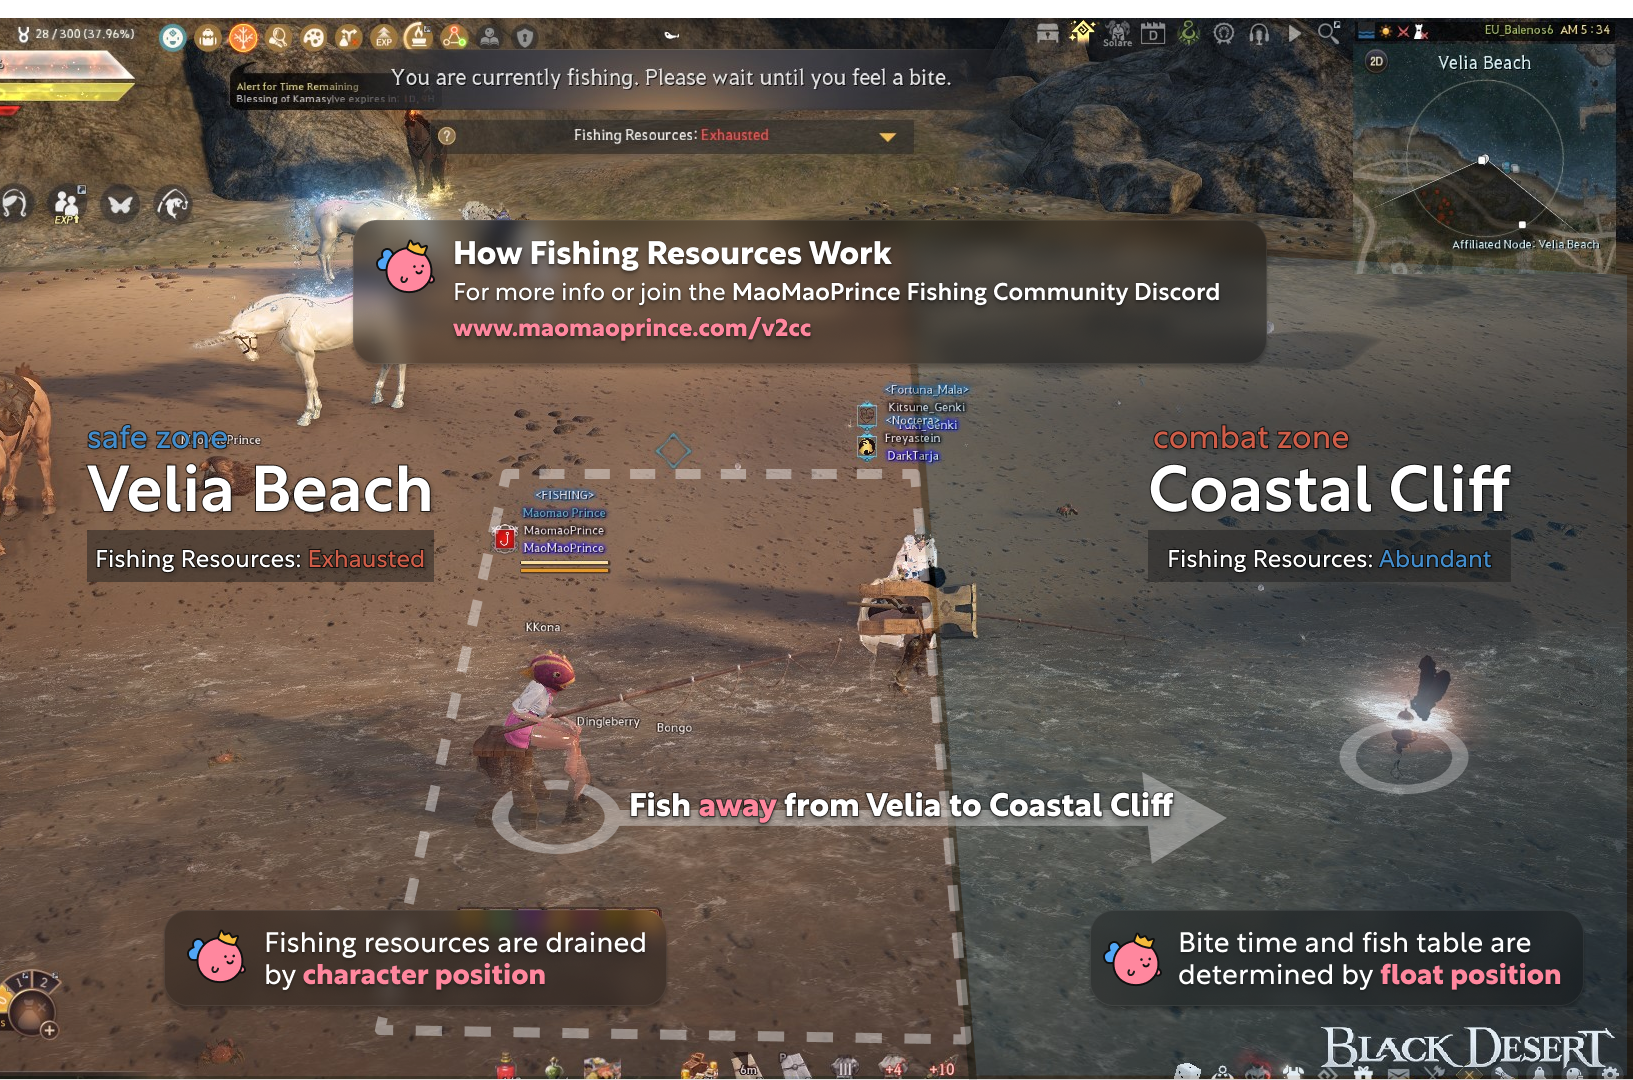
Extra Tip: When fishing in Velia, if you have a pre-level 50 character with PVP protection, you can fish outside the safe zone in the Coastal Cliff area. This is worth doing if the resources at Coastal Cliff are not exhausted, as Velia Beach is always exhausted resources. If you don’t have a pre-level 50 character, you can still fish in the safe zone and cast your rode into the Coastal Cliff area. The bite time and fish table are determined by the area your float lands, while the resources are drained at the location your character stands. Check the image below from MaoMaoPrince Fishing discord for a great visual example:
Although Velia is generally the best spot, it always has Exhausted resources. If you really want to try other spots, stick to what are known as “30/10 spots” and look for one with Abundant resources if you want the silver to contest Velia Beach. “30/10 spots” are fishing locations where for every 30 Yellow Corvina fish you catch, you are expected to catch 10 Blue Bat Stars, meaning that even without a jackpot fish, you are still expected to make a good amount of silver.
Below is a list of all “30/10 spots”:
| Location (click links to open image) |
Prizefish Catches |
|---|---|
| Velia Beach/Coastal Cliff | |
| Cron Islands Depth 4 | |
| Sausan Islands Depth 3 Sausan Islands Depth 4 |
|
| Valencia Sea Depth 5 | |
| Mediah Sea Depth 3 | |
| Mediah Sea Depth 4 |
- Fish location images from Flockenberger and Karpfen – BDO Fish Waypoints
Where and how to sell your fish
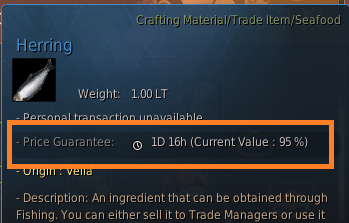
Once you catch a fish, it will have a price guarantee period with an expiry time on them. The longer you take to sell the fish, the lower the price will go until you reach 0% value and the fish can no longer be sold.
- Normal fish have a 48h (2 days) price guarantee
- Fish caught in O’dylita have a 60h (2.5 days) price guarantee
- Fish caught in Mountain of Eternal Winter have a 73h (3 days) price guarantee
Fish must be sold to Trade Manager NPCs, which can be found in towns and cities. In order to make the most silver you can, you want to take the fish as far as possible for a large Trade Distance Bonus.
For example, if you are fishing in Velia, the best location you can take your fish would be Yukjo Street (Seoul – LOML) or Bukpo (north of Seoul).
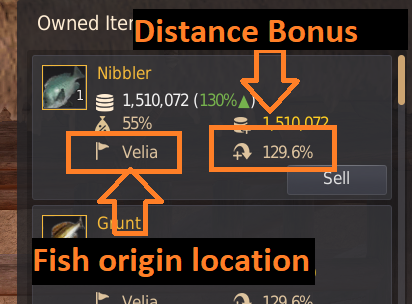
- When selling any trade goods, you gain an extra silver bonus called the “distance bonus”.
- The greater the distance between the original location you obtained the trade item and the location where you sell it, the greater the distance bonus.
- The distance bonus is calculated by taking the base price of the fish and then multiplying that by a set percentage. The distance bonus is then added to the current sell price.
- The distance bonus can be a maximum of 150%.
Below are some examples of the distance bonus (%) between two locations:
| Olvia | Velia | Heidel | Calph | Epheria | Trent | Altinova | Valencia | Arehaza | Grana | Duven | Odraxxia | Nampo | |
|---|---|---|---|---|---|---|---|---|---|---|---|---|---|
| Olvia | 0% | 10.96% | 16.38% | 14.2% | 15.32% | 29.03% | 37.12% | 79.62% | 95.92% | 47.09% | 36.65% | 49.34% | |
| Velia | 10.96% | 0% | 7.68% | 19.67% | 24.68% | 33.53% | 26.17% | 69.61% | 85.77% | 50.8% | 32.8% | 47.18% | 115.3% |
| Heidel | 16.38%) | 7.68% | 0% | 19.45% | 26.86% | 31.09% | 22.65% | 69.21% | 84.98% | 47.14% | 25.72% | 40.5% | 121.5% |
| Calph | 14.2% | 19.67% | 19.45% | 0% | 9.46% | 14.86% | 41.97% | 88.43% | 104.34% | 32.9% | 27.54% | 37.68% | 108.4% |
| Epheria | 15.32% | 24.68% | 26.86% | 9.46% | 0% | 18.57% | 49.45% | 94.28% | 110.46% | 35.77% | 36.69% | 45.57% | |
| Trent | 29.03% | 33.53% | 31.09% | 14.86% | 18.57% | 0% | 51.85% | 99.84% | 115.26% | 18.08% | 25.37% | 29.29% | |
| Altinova | 37.12% | 26.17% | 22.65% | 41.97% | 49.45% | 51.85% | 0% | 48.37% | 63.45% | 65.5% | 36.32% | 50.69% | 140.6% |
| Valencia | 79.62% | 69.61% | 69.21% | 88.43% | 94.28% | 99.84% | 48.37% | 0% | 16.46% | 113.85% | 83.81% | 97.04% | 150% |
| Arehaza | 95.92% | 85.77% | 84.98% | 104.34% | 110.46% | 115.26% | 63.45% | 16.46% | 0% | 128.6% | 97.83% | 110.31% | |
| Grana | 47.09% | 50.8% | 47.14% | 32.9% | 35.77% | 18.08% | 65.5% | 113.85% | 128.6% | 0% | 31.85% | 26.09% | 121.3% |
| Duven | 36.65% | 32.8% | 25.72% | 27.54% | 36.69% | 25.37% | 36.32% | 83.81% | 97.83% | 31.85% | 0% | 15.15% | 135.5% |
| Odraxxia | 49.34% | 47.18% | 40.5% | 37.68% | 45.57% | 29.29% | 50.69% | 97.04% | 110.31% | 26.09% | 15.15% | 0% | 141.8% |
| Nampo | 115.3% | 121.5% | 108.4% | 140.6% | 150% | 121.3% | 135.5% | 141.8% | 0% |
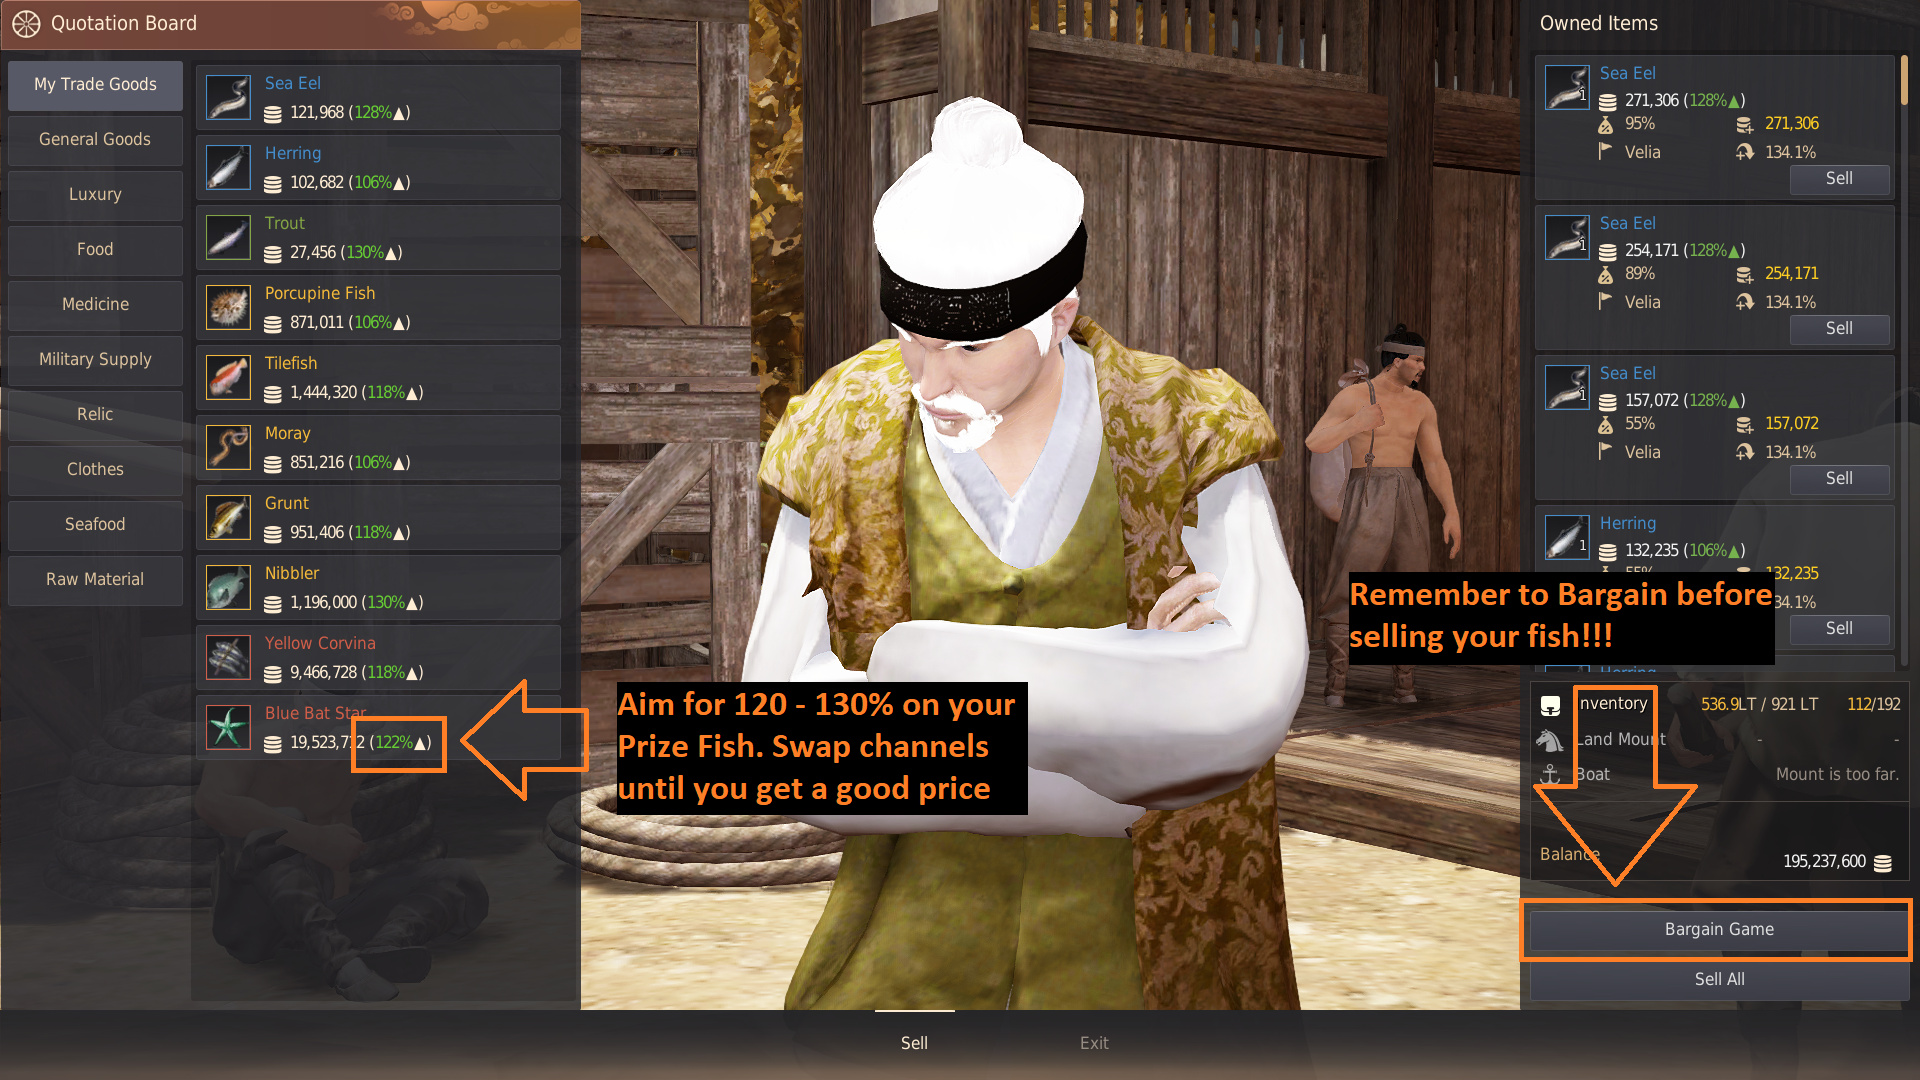
You can take the Magnus Teleport to your selling location. When you are at the Trade Manager, check the prices of the Prize Fish. Ideally you want between 120-130% price on the fish, and if it is lower, you can swap channels to check another. When you have found a good sale price, make sure to bargain with the trader first for extra silver as well.
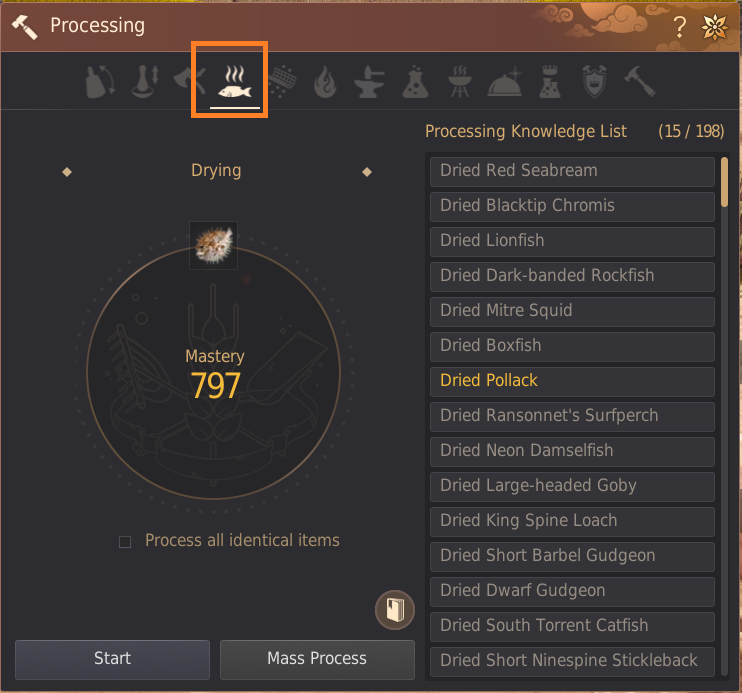
Dried Fish
You can also dry fish through the Processing (L) window and selecting the Drying option. Drying fish before they expire will preserve them, but then you can no longer sell them to a trader. Instead, they can now be sold on the Central Market, but they are not worth much compared to selling to a trader. Dried fish are used in cooking recipes.
Imperial Fishing Delivery
You can find the nearest Imperial NPC by clicking on the Magnifying Glass in the top left next to your minimap and searching for “Fishing” in the search box. Blue and Yellow fish can also be sold at an Imperial Fishing Delivery NPC for 250% of the fish base price, but the NPC will only accept a certain number of fish of each type. The fish freshness (price guarantee) also does not matter when selling to an Imperial Fishing Delivery NPC (as long as it is not 0%)
Although the Imperial Fishing NPC offers a higher sell price, there is no distance bonus for selling your fish to the Imperial Fishing Delivery NPC. You also have to consider that the NPC will only accept blue and yellow-grade fish (not prize fish) and that they only accept a limited number of each, so you may find it hard to find an NPC that will buy your fish. In most cases, it is better to just sell to a normal trader because you can get the distance bonus + bargain bonus.

When selling fish through an Imperial Fishing Delivery NPC, you earn ![]() Golden Seal – [Imperial Fishing] and also have the chance of randomly obtaining a Fishing Artifact.
Golden Seal – [Imperial Fishing] and also have the chance of randomly obtaining a Fishing Artifact.
You can exchange Golden Seals directly in the Manage Currency UI.
- Click the Manage Currency icon
 on the top right of the screen (next to your mini-map).
 - Or open the UI by going to the ESC Menu – Rewards (F3) – Manage Currency Menu
| Seals Required | Exchanged Item |
|---|---|
Miraculous Fish Tank
 Shim Cheong’s Miraculous Fish Tank is an item in your inventory that works as a special bag and can hold up to 50 fish, freeing up inventory space and allowing you to fish for longer periods.
Any fish that are currently stored in the fish tank also have a longer expiry time, increasing the duration by x5.
- Normal fish have a 48h (2 days) price guarantee ⇒ extended to 240h (10 days)
- Fish caught in O’dylita have a 60h (2.5 days) price guarantee ⇒ extended to 300h (12.5 days)
- Fish caught in Mountain of Eternal Winter have a 73h (3 days) price guarantee ⇒ extended to 360h (15 days)
Shim Cheong’s Miraculous Fish Tank can be obtained once per family by completing a questline.
- To complete the full questline, you will need knowledge “The Tale of Shim Cheong” which is obtained from the Shim Cheong Questline
- The Shim Cheong questline starts at the NPC Shim the Blind at Solgaji Forest, and has no requirements to start.
Fishing Byproducts
When catching any fish using a fishing rod, you have a chance to obtain an item called “Discarded Glass Bottle“.
You can then exchange x5 of this item at NPC Liana or NPC Crio for other materials, or Contribution and Fishing EXP.
- Liana can be found in all major cities next to Jetina/Fughar/Stable Keeper. If you cannot find the NPC, use the “Find NPC” function to search for “Liana” (ESC Menu > Function > Find NPC)
- Crio can be found in Velia on the dock near the Storage Keeper
| Required Items | Exchangeable Items (Select one) | ||
|---|---|---|---|
|
Discarded Glass Bottle x5
|
Crio’s Sturdy Fishing Chair x1 |
||
Silver Key x15 |
|||
Breezy Conch Seaweed x1 |
|||
| 900 Contribution EXP + 30 Fishing EXP |

Fishing Leap Quests
The Fishing Leap Quest chain can be completed to obtain rewards and large Fishing EXP boosts.
- For example, completing the first quest in the chain “[Fishing Leap Apprentice 5] I Feel Exhausted Lately” can be completed once you are Fishing Apprentice Lv. 4 or higher, and gives approximately 50% EXP at that level.
The quests can be found in your Quest log (O) under the “Suggested” tab.
These quests are available once per character

| Quest Name | Start NPC | How to Complete |
|---|---|---|
|
[Fishing Leap Beginner 10] Bartering |
Crio | 1. Catch 3 green grade fish by fishing. 2. Hand over the fish to Karin. |
| [Fishing Leap Apprentice 5] I Feel Exhausted Lately |
Silen | 1. Catch 3 green grade fish by fishing. 2. Hand over the fish to Silen. |
|
[Fishing Leap Apprentice 10] I Love Hot & Spicy Food |
Kanna’s Assistant | 1. Catch 5 green grade fish by fishing. 2. Hand over the fish to Kanna’s Assistant. |
| [Fishing Leap Skilled 5] The Best Fish in Serendia |
Grace Lauren | 1. Go to Demi River. 2. Catch blue grade fish from Demi River. 3. Hand over blue grade fish to Grace Lauren. |
|
[Fishing Leap Skilled 10] Nothing’s Good |
Ario | 1. Catch green and blue grade fish from the river in Calpheon. 2. Hand over the fish to Ario. |
[Fishing Leap Professional 4]All Because of Trash! |
Shai | 1. Take the boat and go to the deeper water to catch Porgy. 2. Come back and report to the fisher. |
|
[Fishing Leap Professional 7] A Skilled Fisher |
Kuro Barellian | 1. Sail to the place Kuro Barellian mentioned. 2. Set up a Harpoon and press (Jump) to start. 3. Once a fish starts biting, press (Jump) to start Harpooning. 4. Move your mouse to aim at the target and press (Jump) to successfully harpoon. 5. Give the Requiem Shark and Whale Shark to Kuro Barellian.※ Requiem Shark and Whale Shark can only be caught by Harpooning. |
|
[Fishing Leap Professional 10] The Delicacies of Epheria |
Lamiro Iadans | 1. Take the boat to the deeper ocean and find a school of fish. 2. Catch Sea Bass and Eyespot Puffer from the school of fish. 3. Hand over the Sea Bass and Eyespot Puffer to Lamiro Iadans.※ Eyespot Puffer and Sea Bass can only be caught by fishing from a school of fish. |
|
[Fishing Leap Artisan 4] The Master Fisher of Splashing Point |
Villager | 1. Catch 5 Leather Carp 2. Catch 10 Piranha 3. Catch 15 Yellow-head Catfish |
|
[Fishing Leap Artisan 7] Song of the Sea and Fish |
Bereo | 1. Catch 50 Black Porgy 2. Catch 50 Eyespot Puffer 3. Catch 50 Spotted Sea Bass 4. Catch 50 Giant Octopus 5. Catch 50 Blue Grouper |
|
[Fishing Leap Artisan 10] A Fishing Master |
Bavio | 1. Catch a Sperm Whale 2. Catch 6 Coelacanth |
Alongside these quests, you can complete the “[Leap] Honor to the Fishing Family” quests for additional rewards.
You must have completed the previous Fishing Leap quests on your current character to accept these additional quests.
- For example, to start the [Leap] Honor to the Fishing Family #1 quest, you must have completed the [Fishing Leap Beginner 10] Bartering quest on the current character
These quests are available once per family.
| Quest Name & Requirements | NPC | Rewards |
|---|---|---|
| [Leap] Honor to the Fishing Family #1 Complete [Fishing Leap Beginner 10] Bartering |
Silen | Breezy Conch Seaweed x50 Crio’s Sturdy Fishing Chair x1 |
| [Leap] Honor to the Fishing Family #2 Complete [Fishing Leap Apprentice 10] I Love Hot & Spicy Food Complete [Leap] Honor to the Fishing Family #1 |
Silen | Perfume of Swiftness x10 Marvelous Balacs Lunchbox x10 |
|
[Leap] Honor to the Fishing Family #3
|
Bartholomeo |
Gold Key x5 Ash Tree Float x1 Memory Fragment x10 |
| [Leap] Honor to the Fishing Family #4 Complete [Fishing Leap Professional 10] The Delicacies of Epheria Complete [Leap] Honor to the Fishing Family #3 |
Bartholomeo |
Mysterious Blue Conch x100 [Event] Item Brand Spell Stone x1 |
| [Leap] Honor to the Fishing Family #5 Complete [Fishing Leap Artisan 10] A Fishing Master Complete [Leap] Honor to the Fishing Family #4 |
Cobrio |
Inventory +8 Expansion Coupon x1 [Event] Item Brand Spell Stone x1 |
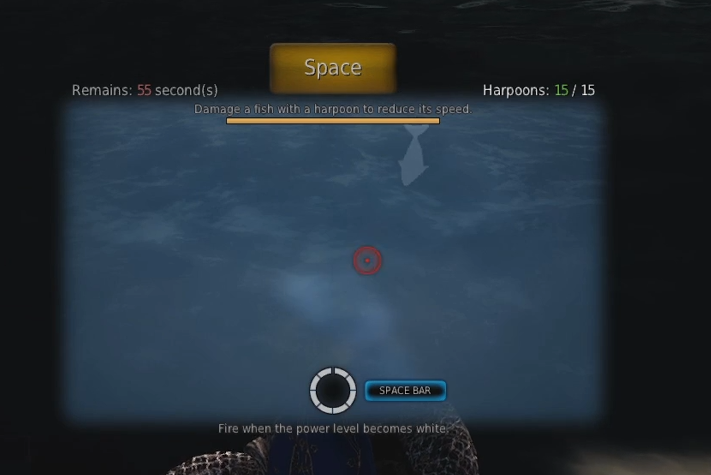
Harpoon Fishing
Harpoon Fishing is another type of fishing, but it is generally not recommended as the silver income is inconsistent, it takes more time, and must be done actively. Unlike regular fishing, there is no way to skip the mini-game, and different gear is used. You will also need a Fishing Boat or Cog Ship (harpoons cannot be used on Epheria ships) and must go into deep water in the sea to begin Harpoon Fishing.
Harpoon guns can only be made in the tool workshops on Iliya Island or Grana and are required for Harpoon Fishing instead of Fishing Rods.
- Grana 10
- Grana 12, 2F
- Grana 3, 1F
- Grana 8
- Iliya Island 4-1
| Item Name | Details | How to obtain | |
|---|---|---|---|
| Thin Harpoon (Requires Fishing Professional Lv.5) |
Durability: 30 Cannot be repaired |
Tool Workshop (Level 1) Cedar Timber x1, Copper Ingot x4, Black Stone Powder x1 |
|
| Thick Harpoon (Requires Fishing Professional Lv.5) |
Durability: 40 Cannot be repaired |
Tool Workshop (Level 2) Cedar Timber x2, Iron Ingot x7, Black Stone Powder x3 |
The aim of the mini-game is to shoot the fish that swims around by moving your mouse to aim and pressing [SPACE]. You only have a certain number of harpoons and a limited time to hit the fish and bring its health to zero to catch it.
Hotspot Fishing
Hotspot fishing is a type of “active” fishing. Having a ship and being active is essential because most hotspots spawn are in the middle of the sea, and the hotspot only lasts for 30 minutes before moving. To get a boat you can either buy it off the central market or craft it yourself. For more information on boats, have a look at our ships guide.
Hotspots have specific spawn locations but are completely random and only last for 30 minutes before moving to another random spot.
Hotspots are indicated by a school of fish jumping out of the water with seagulls surrounding it. If you are fishing inland on a river or lake, you will only see the school of fish jumping out of the water. The higher your fishing lifeskill level, the more hotspots you will be able to see.
Hotspots will only give you yellow-grade fish of one type. For example, you may find a Grunt hotspot, where you can only catch grunt fish. Due to this, hotspots can be highly profitable.
There are also special Coelacanth hotspots. Coelacanth is a fish that is worth 125,000 silver. Unlike other hotspots, these Coelacanth hotspots will disappear after the first fish is caught. They spawn close to the ports of Velia, Epheria, and Arehaza, as well as a couple of other spawns.
There is also a chance you can catch multiple fish with one cast on a standard fishing rod. If you hold down [SPACE] and invest energy into your cast. With a maximum of 10 energy points, you can roll for a chance to catch multiple fish. If you combined this method with a Triple-Float Fishing Rod, you have a chance to obtain 5 fish in one cast!
Carrack Sailor Fishing
Players with an Epheria Carrack can benefit from automatic sailor fishing.
- To begin, you will need the Oceanbound Otter Fishing Rod installed onto your carrack to allow sailors to fish while onboard.
- You must also make sure you have a sailor assigned to your fishing slot in your Manage Sailor UI.
More information about the Carrack Sailor Fishing can be found in our Epheria Carrack Guide


Good news! The Miraculous Fish Tank no longer requires weekly resets to obtain, I just got all the shellfish off of the otter at once.
How to figure it out where to catch a specific type of fish?
For example I would like to catch Mudskipper or Tuna, how to find a location where I can catch it?
@Midoriwicca Thanks for pointing it out! I’ll try get that fixed.
@Scorpion The lifespan of the boat does not increase with the DP you have on the boat. It’s the same for every same type of boat regardless if it’s equipped or not.
Gide is really compleat.. but it have a little mistake…
3rd Sea Node is not conected with 4th in th image… yo have to travel to the “UP” node and take it, THEN you can continue aquiring nodes as the gide said…
You must to know that you´re going to spend 7 contributions points at all.
^^!! I hope this will be useful.
I have a question I cannot find answer to. The fishing boat degrades how just by usage (movement)? Also if you have high dps on the boat does it degrade slower?
Thanks, David! I’ll be sure to edit that in.
“You can do this by pressing “Esc (default)” > “Disconnect” > “End Game” with “Send to tray when quitting” checked.”
I believe this only works if you are NOT in fullscreen mode. E.G. Fullscreen Windowed, or Windowed, then the option to send to tray is available.
Thank you 🙂
The rods that can be repaired, can they be repaired like the normal items e.g. by going to a Blacksmith and clicking on the repair icon?
Or is there something special needed for them to get repaired?
Yes. To repair a rod you just need to go to a blacksmith and repair like any other piece of equipment.